
Project M3 - The Midpoint
So we've reached the midpoint in the M3 project and I figured it would be a good time to take it out for some non-Blackberry shop photos. Plus I had to take advantage of the great weather we've been having (especially after cleaning up Sam's HRE x Fall Line Motorsports 18″ wheels). MAN these wheels are really growing on me. I've never really been a fan of all black wheels, but the gloss really brings them out nicely. Sam, can I just have these? J/K! Check out the photos:
.jpg)
.jpg)
.jpg)
.jpg)
.jpg)
.jpg)
.jpg)
Shoot me an e-mail here if you want any of these in high resolution! Anyway, the first half of the M3's newest modifications have been focused on its "track support" - essentially beefing up the car's components to perform better on the course. Most of these mods aren't things you can readily see, but you can definitely feel (and hear). If you haven't kept up with the mods to date, here's the list:
As mentioned in my previous post, when the KWs were first installed, we dropped the rear WAY too low. The next day I went back to the shop to adjust them. Ilia over at IND Distribution actually informed me that you could adjust the rear coilovers without having to remove the wheels because of the M3's helper spring. To my amazement, you could turn the spring to adjust the ride height up or down by hand (counter-clockwise in this case) once you jacked the car up.
.jpg)
.jpg)
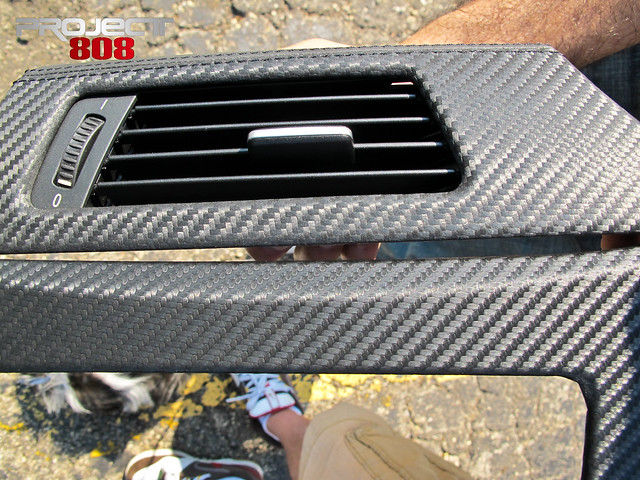
I actually thought my car came with the carbon leather trim, but to my slight disappointment, I had made an error and overlooked that it came with aluminum. Thankfully, JH over at Wheel STO hooked me up with some Carbon Guard carbon fiber fabric (in matte black) that mimics the OEM carbon leather trim without the thousand dollar price tag. You can pick up some for yourself here. Check out the comparison photo:
From start to finish (and a few breaks in between), I'd say the entire process took around 2.5 hours. The fabric is incredibly easy to work with and stretches quite readily without losing its pattern. Just be mindful when you're exposing the adhesive...if it sticks to itself, it's pretty tough to separate. The hardest part was actually reattaching the wires into the back of the center console piece after wrapping it since BMW didn't give much extra wire to play with. They must have someone with tiny fingers installing those at the factory. Here are some progress photos to show how the Carbon Guard fabric works:
.jpg)
.jpg)
.jpg)
.jpg)
Overall, I'm extremely happy with how the car is progressing in such a short amount of time. The second phase of the project is, unfortunately, where I really have to make the hard decisions as to what makes it onto the car and what doesn't. The bulk of these mods will dramatically change the look of the car as it stands today. Stay tuned on UMG for more updates!
Shoot me an e-mail here if you want any of these in high resolution! Anyway, the first half of the M3's newest modifications have been focused on its "track support" - essentially beefing up the car's components to perform better on the course. Most of these mods aren't things you can readily see, but you can definitely feel (and hear). If you haven't kept up with the mods to date, here's the list:
GT Motoring X-Pipe
Rogue Engineering SSK
(replaced Active Autowerke SSK)
Rogue Engineering pulley
(sold Evosport pulley prior to installation in favor of Rogue unit)
Rogue Engineering toe arms
KW Clubsport coilovers
Macht Schnell stud conversion
Muteki SR48 lug nuts
As mentioned in my previous post, when the KWs were first installed, we dropped the rear WAY too low. The next day I went back to the shop to adjust them. Ilia over at IND Distribution actually informed me that you could adjust the rear coilovers without having to remove the wheels because of the M3's helper spring. To my amazement, you could turn the spring to adjust the ride height up or down by hand (counter-clockwise in this case) once you jacked the car up.
A shot of the KWs and RE toe arms with the car jacked up
I actually thought my car came with the carbon leather trim, but to my slight disappointment, I had made an error and overlooked that it came with aluminum. Thankfully, JH over at Wheel STO hooked me up with some Carbon Guard carbon fiber fabric (in matte black) that mimics the OEM carbon leather trim without the thousand dollar price tag. You can pick up some for yourself here. Check out the comparison photo:
From start to finish (and a few breaks in between), I'd say the entire process took around 2.5 hours. The fabric is incredibly easy to work with and stretches quite readily without losing its pattern. Just be mindful when you're exposing the adhesive...if it sticks to itself, it's pretty tough to separate. The hardest part was actually reattaching the wires into the back of the center console piece after wrapping it since BMW didn't give much extra wire to play with. They must have someone with tiny fingers installing those at the factory. Here are some progress photos to show how the Carbon Guard fabric works:
Some quick finished photos in the garage:
Overall, I'm extremely happy with how the car is progressing in such a short amount of time. The second phase of the project is, unfortunately, where I really have to make the hard decisions as to what makes it onto the car and what doesn't. The bulk of these mods will dramatically change the look of the car as it stands today. Stay tuned on UMG for more updates!
Here are the entries so far on the Project M3 (Part II):
Labels: BMW, e90, ind distribution, M3, red death
posted by Unscene at
6:24 PM
![]()

.png)
.png)

0 Comments:
Post a Comment
Subscribe to Post Comments [Atom]
<< Home